


Timestamps are a common way to record dates and times in Google Sheets, but they can be difficult to read and analyze in their raw format. Converting timestamps to a more readable date format is essential for effective data management and analysis. In this step-by-step guide, we'll show you how to convert timestamps to dates in Google Sheets using built-in functions and formatting options.
A timestamp is a sequence of characters that represents a specific date and time. In Google Sheets, timestamps are often stored as strings in various formats, such as "MM/DD/YYYY HH:MM:SS" or "YYYY-MM-DD HH:MM:SS". Converting these timestamps to a more readable date format is crucial for data analysis and visualization.
Timestamps can be generated automatically by Google Forms or imported from external sources like databases or APIs. By connecting Google Sheets, you can:
Bardeen can automate the process of collecting data from various sources and saving it to Google Sheets, including the timestamp of when that data was collected. This allows you to easily analyze and visualize your data over time without manual data entry. Try these playbooks:
In the following sections, we'll explore different methods to convert timestamps to dates in Google Sheets, including built-in functions and custom formatting options.
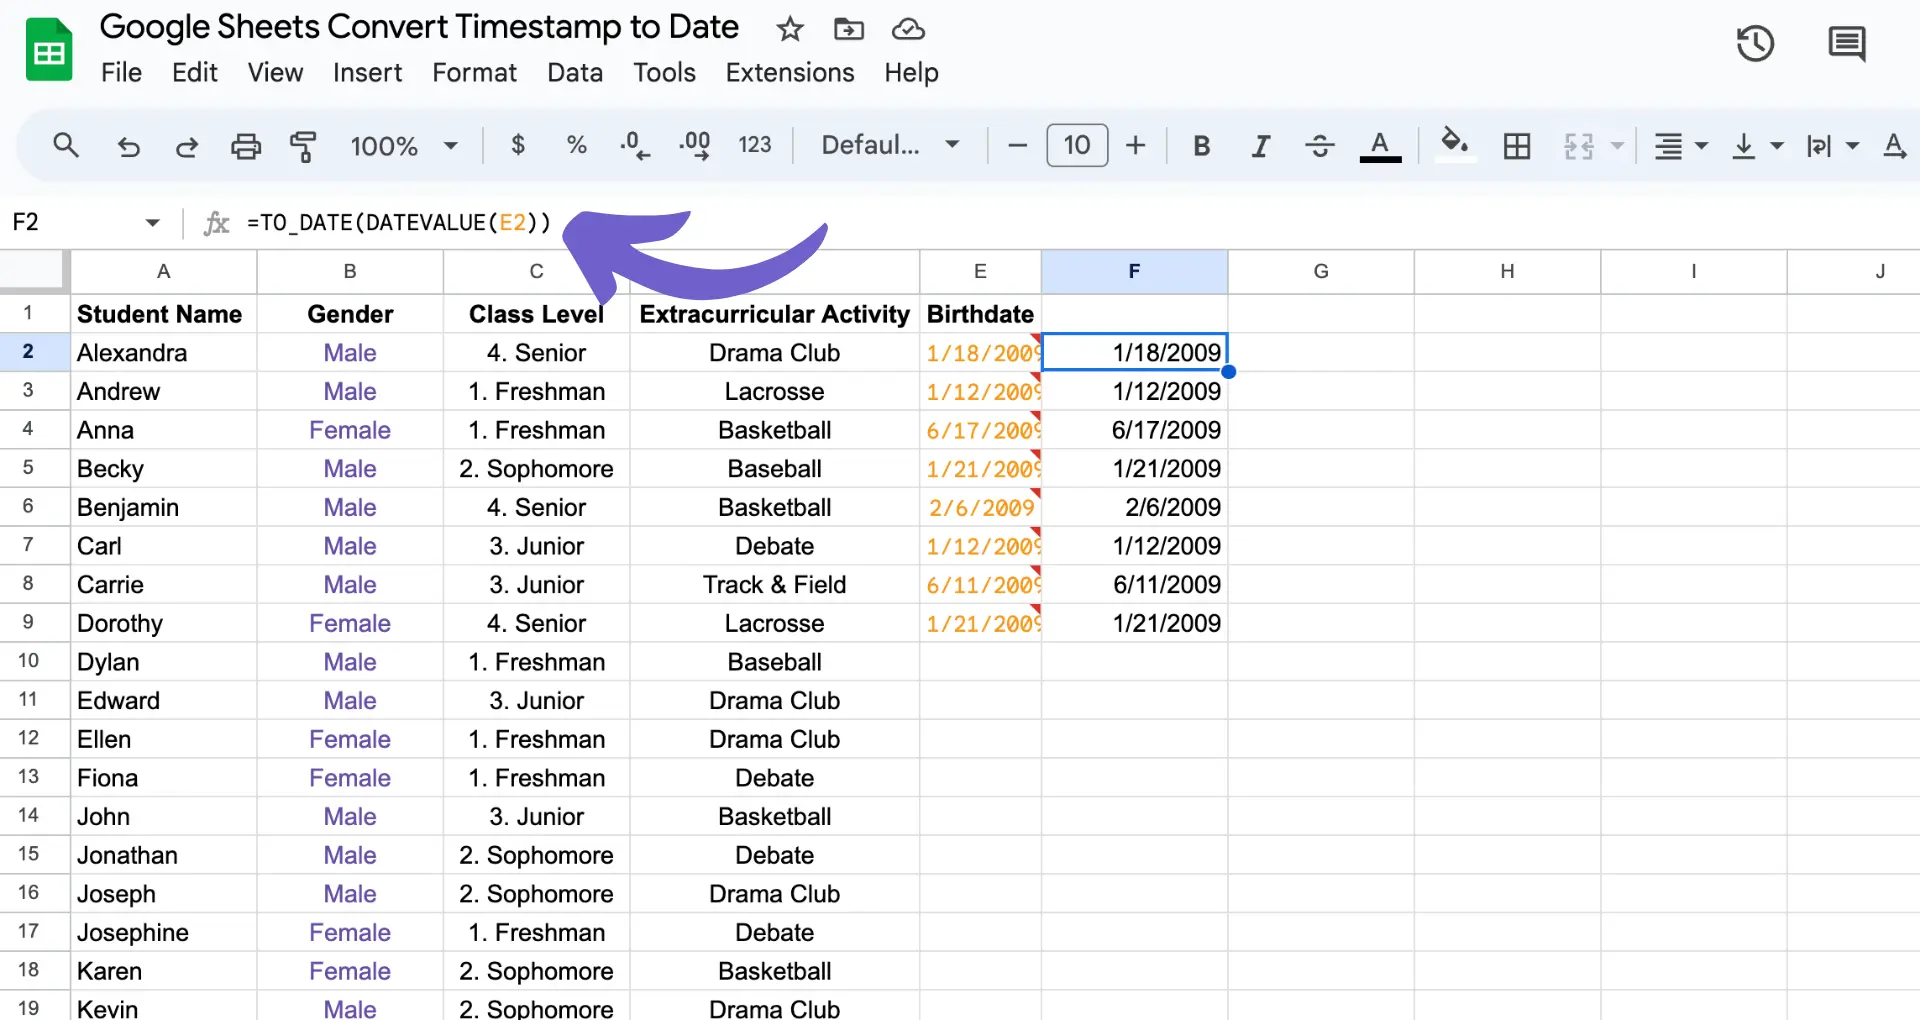
The DATEVALUE function in Google Sheets is a powerful tool for converting string timestamps to a proper date format. To use DATEVALUE, simply pass the timestamp as a string argument to the function. For example:
Here's a step-by-step example of converting the timestamp "2023-04-15 09:30:00" in cell A1 to a date:

Bardeen can help automate importing data with timestamps from various sources directly into Google Sheets, saving you time and effort:
By using DATEVALUE, you can easily extract the date portion of a timestamp and perform date-based calculations or formatting in your Google Sheets. For more advanced uses, check out how to bring AI into your spreadsheet with GPT features.
Save time and focus on important work by learning to add ChatGPT to Google Sheets. Let AI handle your repetitive tasks.
The DATEVALUE function in Google Sheets is a powerful tool for converting string timestamps to a proper date format. To use DATEVALUE, simply pass the timestamp as a string argument to the function. For example:
Here's a step-by-step example of converting the timestamp "2023-04-15 09:30:00" in cell A1 to a date:
After converting a timestamp to a date, you can use Bardeen to automate extracting additional insights or copying that data to other apps. Try these playbooks to streamline your analysis and reporting workflows:
By using DATEVALUE, you can easily extract the date portion of a timestamp and perform date-based calculations or integrate with Excel in your Google Sheets.
Bardeen can also help automate tasks triggered by changes in your Google Sheets, such as generating reports or creating tasks in your project management tool:
The INT function in Google Sheets is another useful tool for converting timestamps to dates. Unlike DATEVALUE, which extracts the date portion from a string timestamp, INT truncates the decimal portion of a number, effectively removing the time part of a timestamp.
When you have a timestamp in a numeric format (like 44663.39583), you can use the INT function to convert it to a date by simply passing the cell reference or the numeric value to the function. For example:
Here are a few more examples of using INT for timestamp conversion:
Keep in mind that the INT function only works with numeric timestamps. If your timestamps are in a string format, you'll need to use DATEVALUE or other functions to convert them first. Additionally, you can integrate Google Docs with Google Sheets to enhance your workflow.
Save time by using Bardeen's automation guides designed to make your document management more efficient.
Bardeen can also help you classify and save emails to Google Sheets for easy reference and analysis later:
Google Sheets offers a dedicated function, EPOCHTODATE, for converting Unix timestamps to readable dates. Unix timestamps represent the number of seconds or milliseconds that have elapsed since January 1, 1970 (the Unix epoch).
To use the EPOCHTODATE function, follow this syntax:
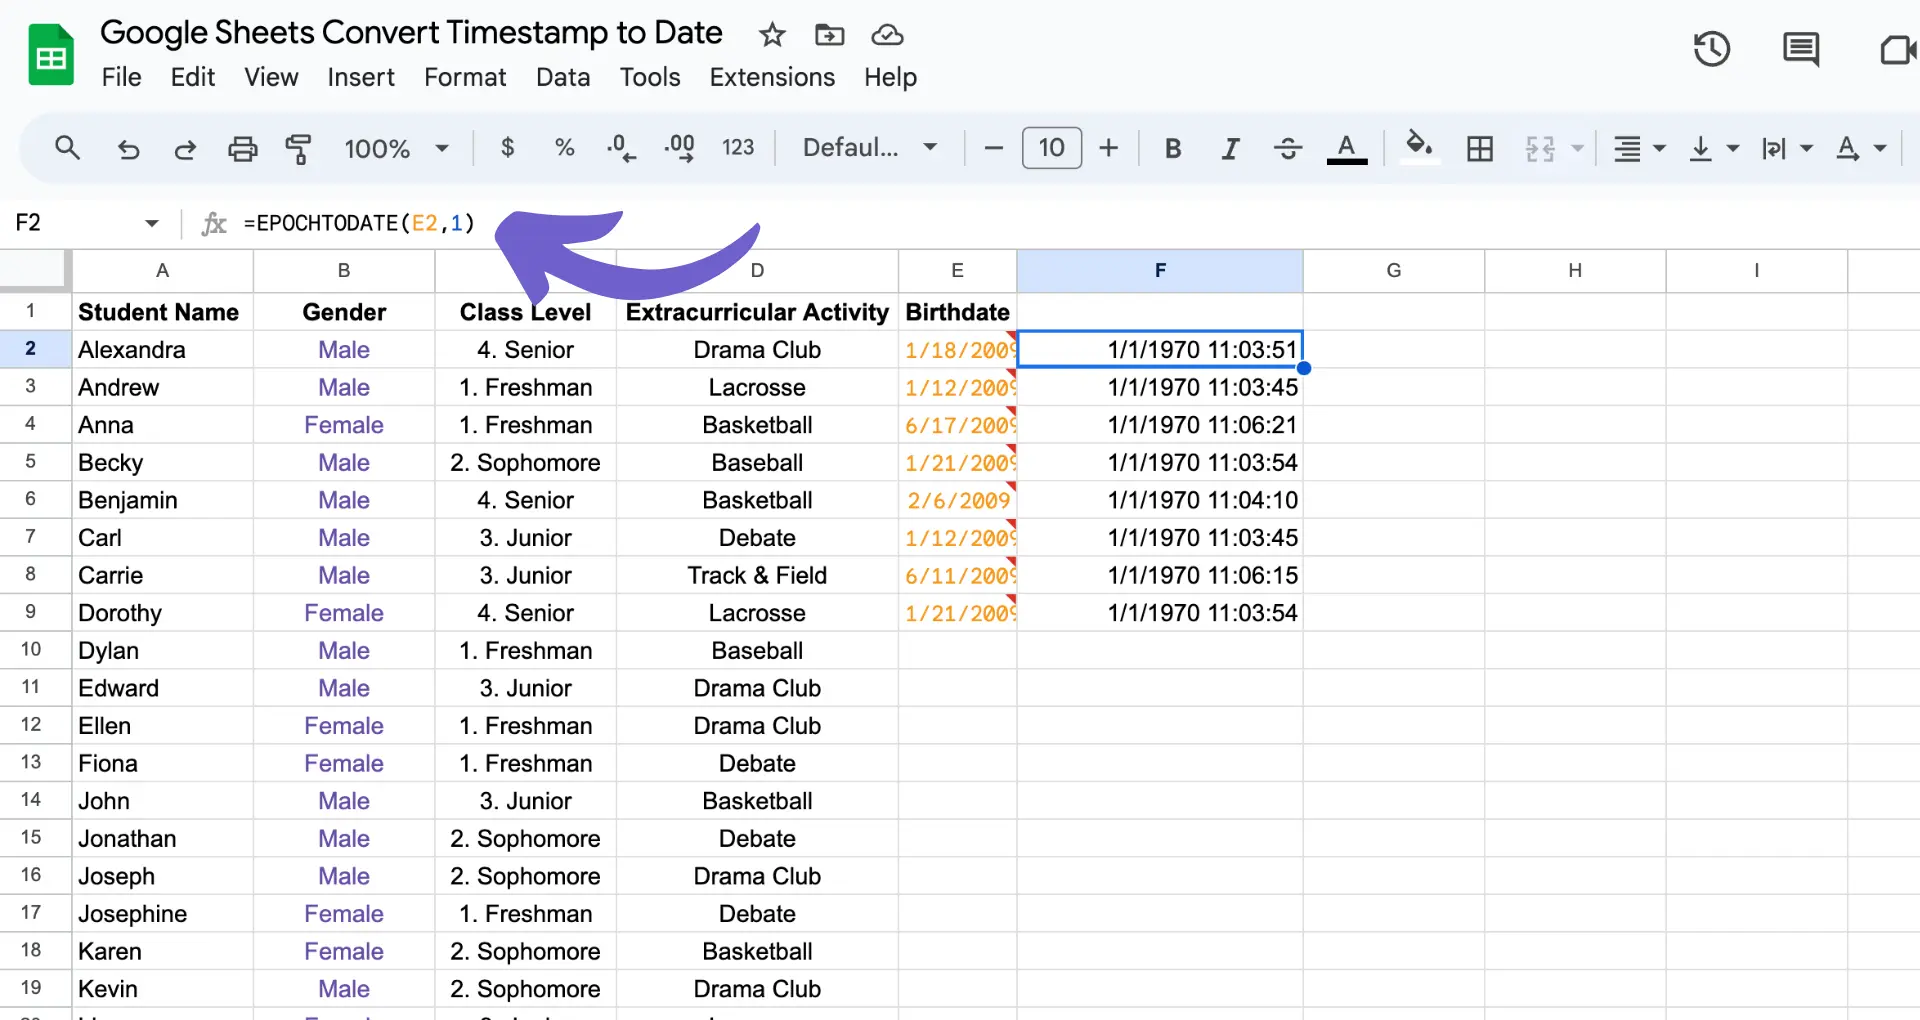
The timestamp argument is the Unix timestamp you want to convert, and the optional unit argument specifies the unit of time for the timestamp:
Bardeen can automate getting data that includes Unix timestamps from various sources and saving it directly to Google Sheets, where you can then use EPOCHTODATE to convert the timestamps:
For example, to convert a Unix timestamp in seconds (e.g., 1655906568) to a date, use:
If your timestamp is in milliseconds (e.g., 1655906568000), specify the unit argument as 2:
Both formulas will return the date: 6/22/2022 14:02:48.
Keep in mind that EPOCHTODATE returns the date and time in UTC (Coordinated Universal Time). To display the result in your local time zone, you can wrap the EPOCHTODATE function inside the ARRAYFORMULA and add the appropriate time zone offset.
Bardeen can also save property data from Zillow, which may include Unix timestamps, directly to Google Sheets:
After converting timestamps to dates in Google Sheets, you can customize the format of the output to match your preferences or maintain consistency across your data sets. Google Sheets provides a variety of built-in date formatting options as well as the ability to create custom date formats.
To format dates in Google Sheets:
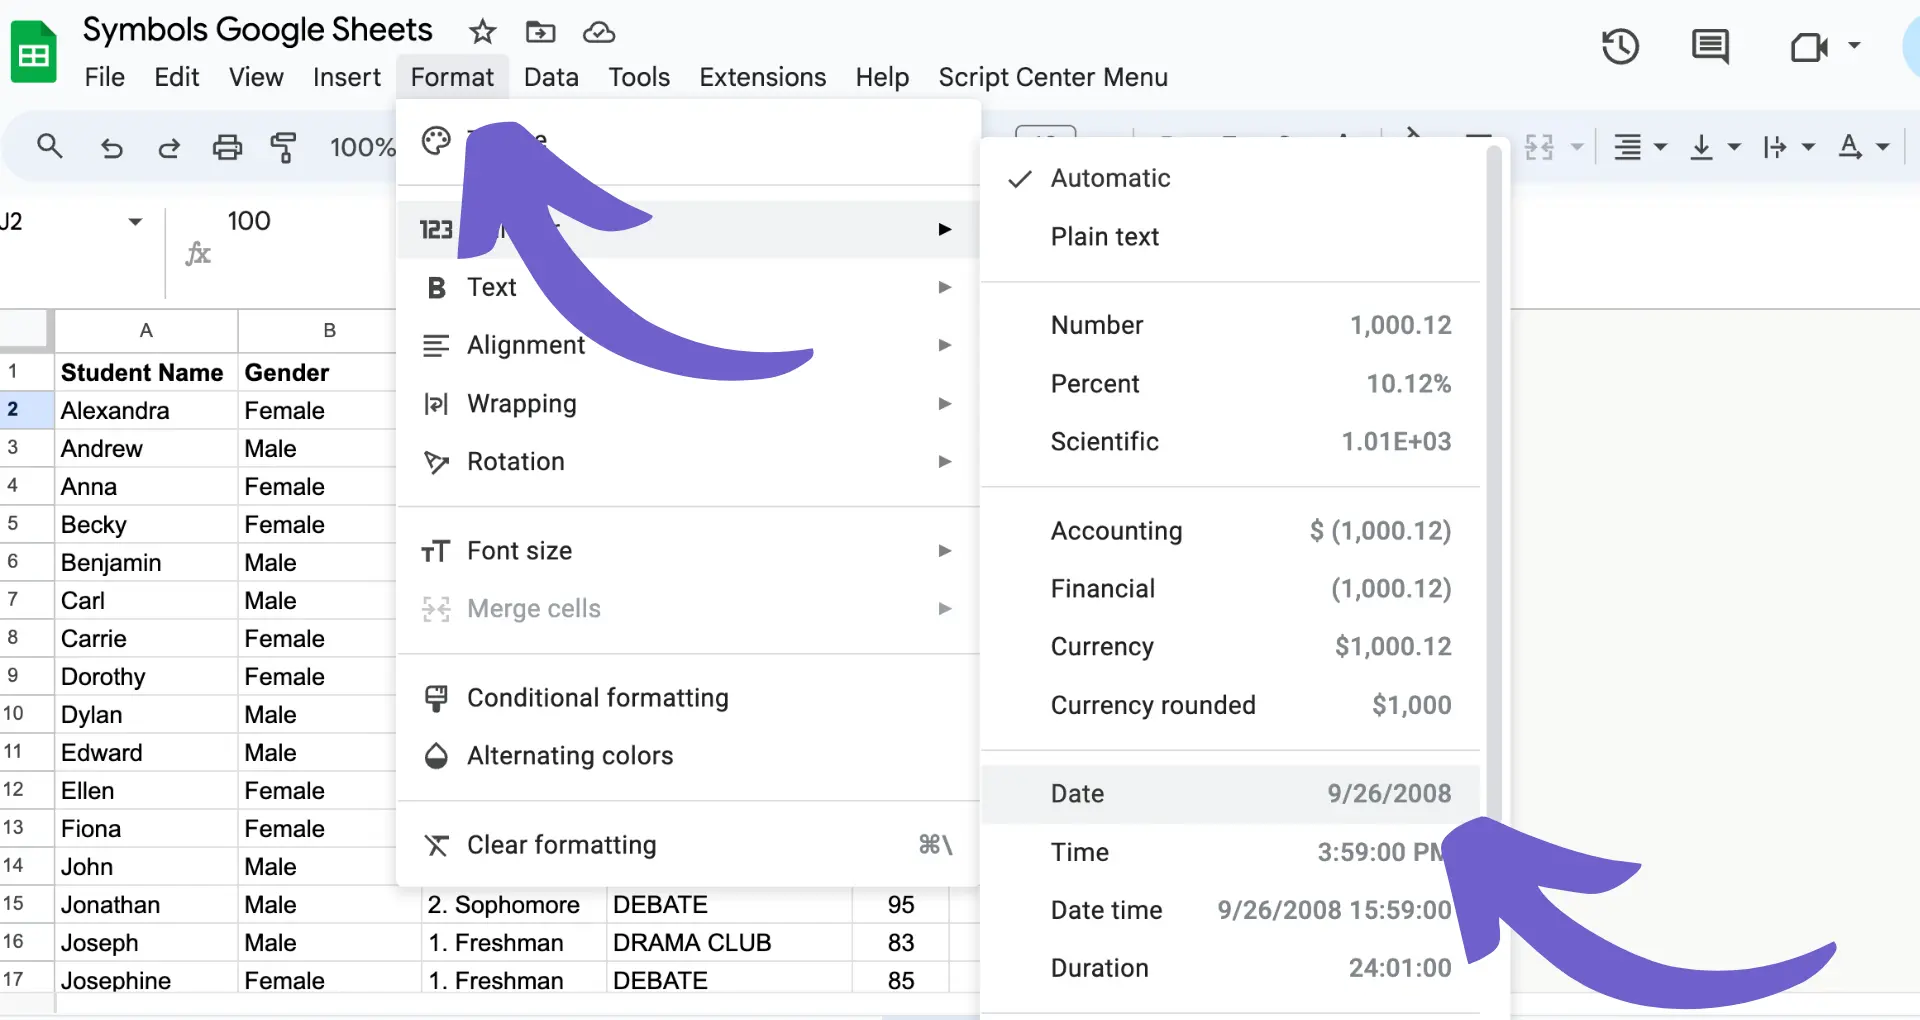
If the predefined formats don't meet your needs, you can create a custom date format:
To ensure consistency in date formats across your data sets, consider:
By taking advantage of Google Sheets' date formatting options and maintaining consistency, you can improve the readability and usability of your data for analysis and reporting purposes.
Bardeen can help automate workflows that involve copying data from various sources into Google Sheets, saving you time from manual copying and pasting. Try these playbooks to populate data into your spreadsheets:
For more advanced uses, check out how to add ChatGPT to Google Sheets to automate and enhance your data management.
Automate your data updates and save time. Learn how to enrich LinkedIn profile links in Google Sheets with Bardeen.
When dealing with large datasets containing timestamps, you may need to convert multiple timestamps at once. Array formulas in Google Sheets can help you achieve this efficiently. An array formula is a formula that performs multiple calculations on one or more sets of values, returning either a single result or multiple results.
To use an array formula for bulk timestamp conversions:
For more complex or conditional date conversions, you can use Google Apps Script to create custom functions. Google Apps Script is a scripting language based on JavaScript that allows you to extend the functionality of Google Sheets.

To create a custom function using Google Apps Script:
Examples of custom functions you can create include:
By leveraging array formulas and custom functions through Google Apps Script, you can streamline your timestamp conversion process and handle more complex scenarios with ease.




SOC 2 Type II, GDPR and CASA Tier 2 and 3 certified — so you can automate with confidence at any scale.
Bardeen is an automation and workflow platform designed to help GTM teams eliminate manual tasks and streamline processes. It connects and integrates with your favorite tools, enabling you to automate repetitive workflows, manage data across systems, and enhance collaboration.
Bardeen acts as a bridge to enhance and automate workflows. It can reduce your reliance on tools focused on data entry and CRM updating, lead generation and outreach, reporting and analytics, and communication and follow-ups.
Bardeen is ideal for GTM teams across various roles including Sales (SDRs, AEs), Customer Success (CSMs), Revenue Operations, Sales Engineering, and Sales Leadership.
Bardeen integrates broadly with CRMs, communication platforms, lead generation tools, project and task management tools, and customer success tools. These integrations connect workflows and ensure data flows smoothly across systems.
Bardeen supports a wide variety of use cases across different teams, such as:
Sales: Automating lead discovery, enrichment and outreach sequences. Tracking account activity and nurturing target accounts.
Customer Success: Preparing for customer meetings, analyzing engagement metrics, and managing renewals.
Revenue Operations: Monitoring lead status, ensuring data accuracy, and generating detailed activity summaries.
Sales Leadership: Creating competitive analysis reports, monitoring pipeline health, and generating daily/weekly team performance summaries.