Capturing leads from your website and seamlessly transferring them to your Salesforce CRM is crucial for effective lead management and sales processes. In this step-by-step guide, we'll walk you through the process of creating a Web-to-Lead form in Salesforce, from understanding the basics to setting up, customizing, and integrating the form on your website. By the end of this guide, you'll have a fully functional Web-to-Lead form that streamlines your lead capture process and enhances your overall sales strategy.
Understanding Web-to-Lead in Salesforce
Web-to-Lead forms are a powerful tool in Salesforce that enables businesses to capture leads directly from their website and seamlessly transfer them into their Salesforce CRM. These forms act as a bridge between a company's online presence and its Salesforce environment, streamlining the lead capture process and ensuring that no potential opportunities slip through the cracks.
Here's how Web-to-Lead forms work:
A visitor fills out a form on your website, providing their contact information and other relevant details
The form data is securely transmitted to your Salesforce org
Salesforce automatically creates a new lead record with the captured information
Your sales team can then access and manage the lead within Salesforce
In the following sections, we'll guide you through the process of setting up, customizing, and integrating Web-to-Lead forms in Salesforce, so you can start leveraging this powerful tool for your business.
Setting Up Web-to-Lead Forms in Salesforce
To set up a Web-to-Lead form in Salesforce, follow these steps:
Log in to your Salesforce account and navigate to the Setup menu
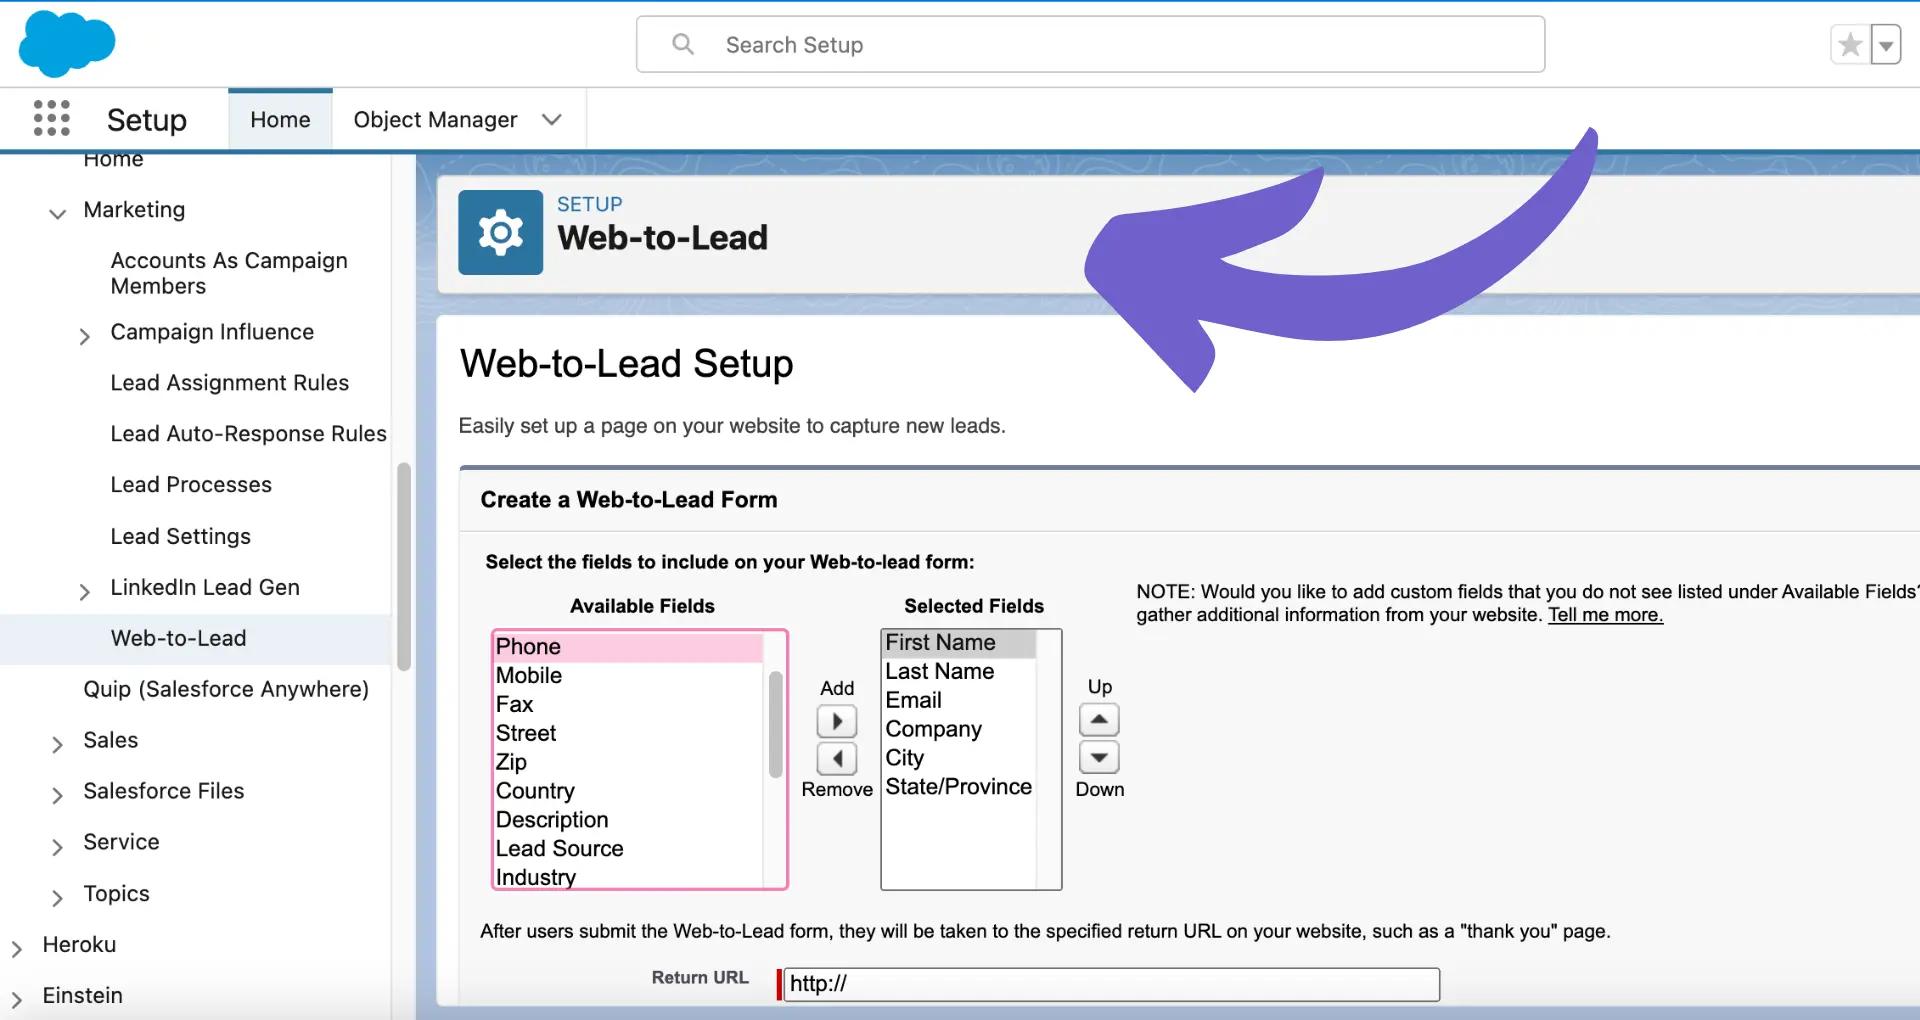
In the Quick Find box, type "Web-to-Lead" and select "Web-to-Lead" from the search results
On the Web-to-Lead setup page, click the "Create Web-to-Lead Form" button
Choose the fields you want to include in your form, such as Name, Email, Phone, and Company
Customize the form layout and design to match your branding
Generate the HTML code for your form and copy it
Paste the code into your website's HTML where you want the form to appear
In the Quick Find box, type "Web-to-Lead" and select "Web-to-Lead" from the search results
When selecting fields for your Web-to-Lead form, consider the essential information you need to qualify and follow up with leads effectively. Strike a balance between gathering sufficient data and keeping the form concise to encourage completion.
Some key fields to include are:
Name (First and Last)
Email
Phone
Company
Job Title
Industry
Message or Comments
By carefully choosing your form fields, you can ensure that you capture the necessary information to effectively qualify and engage with your leads. You might also want to learn about lead enrichment to enhance your qualification process.
Automate the lead enrichment process with Bardeen to save time and get more accurate data. Try lead enrichment automation now.
Customizing Form Fields and Design
To tailor your Web-to-Lead form to your business needs, Salesforce allows you to customize the fields and design of the form. Here's how:
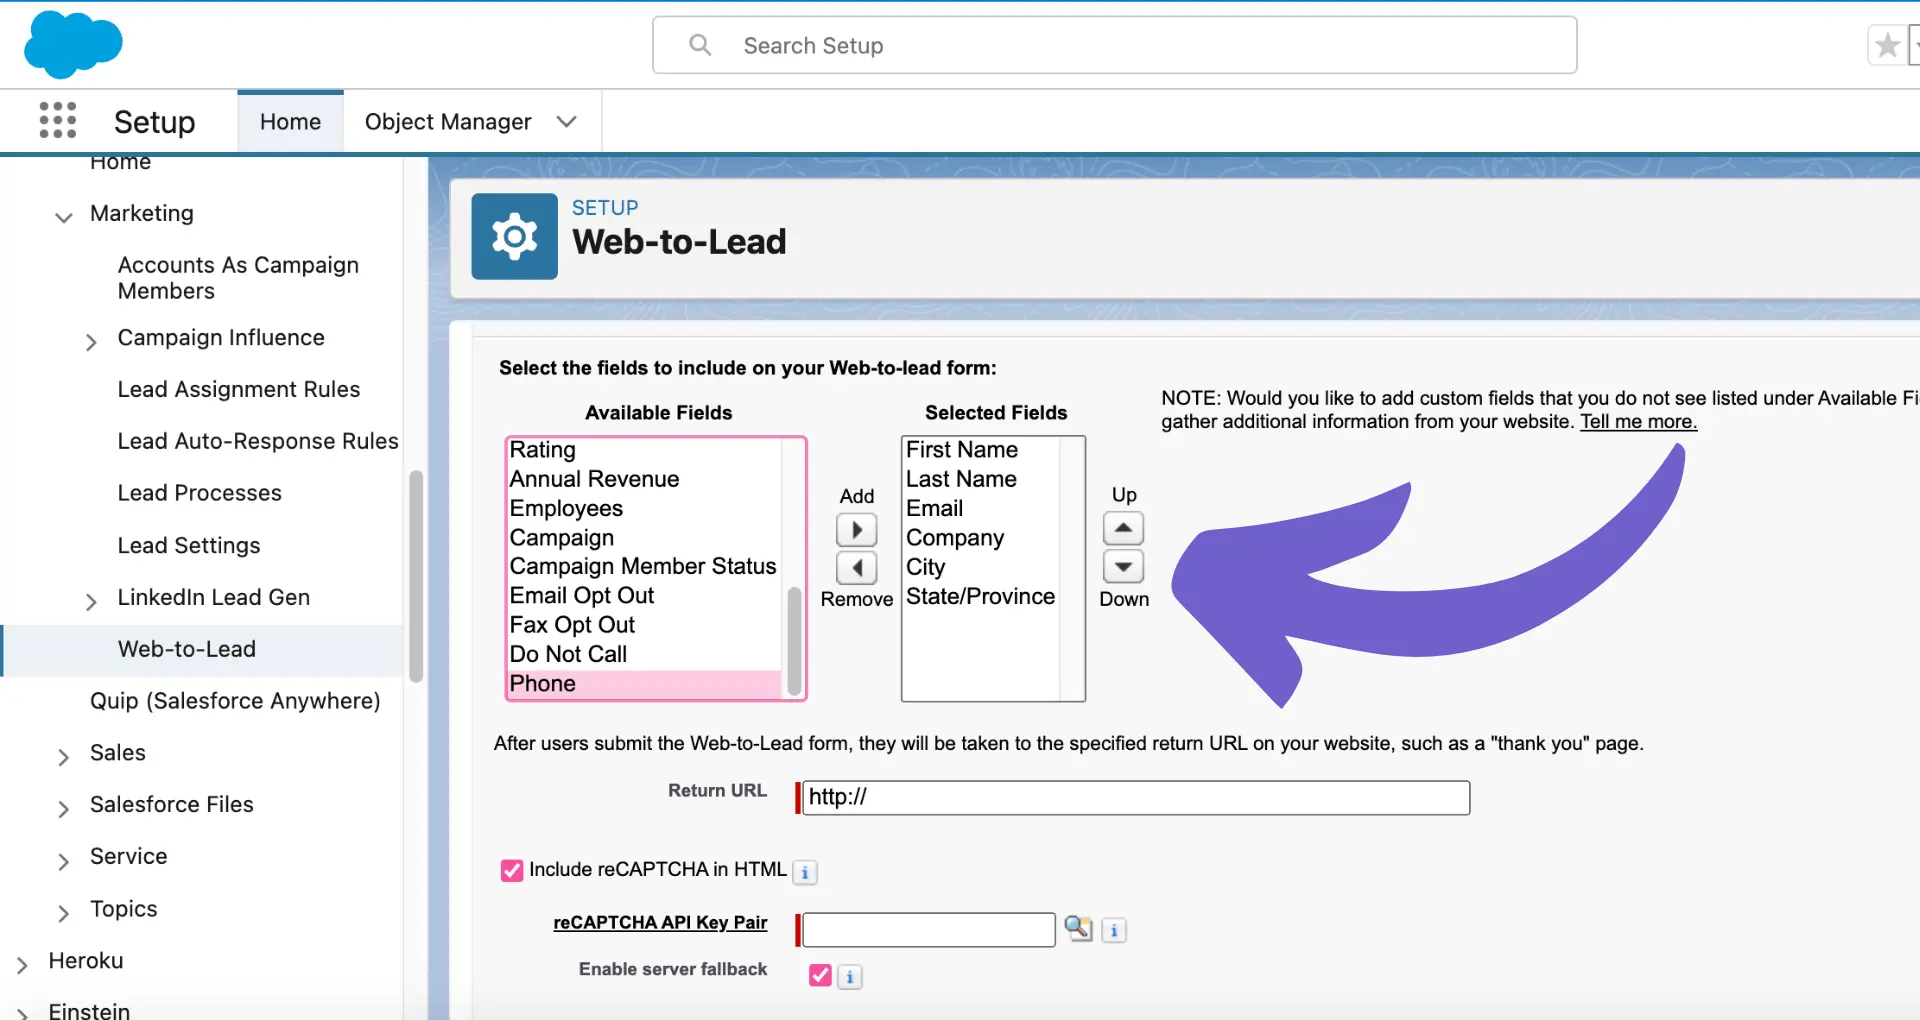
In the Web-to-Lead setup page, select the fields you want to include in your form from the "Available Fields" list
Use the "Add" and "Remove" arrows to move fields between the "Available Fields" and "Selected Fields" lists
Arrange the order of the selected fields using the "Up" and "Down" arrows
Customize field labels by clicking the "Edit" link next to each field in the "Selected Fields" list
Add custom fields to capture specific information relevant to your business by creating them in Salesforce and then adding them to your Web-to-Lead form
Use the "Add" and "Remove" arrows to move fields between the "Available Fields" and "Selected Fields" lists
To ensure brand consistency across your web properties, you can customize the look and feel of your Web-to-Lead form:
Use CSS to style the form elements, such as fonts, colors, and spacing, to match your website's design
Modify the form's HTML to add your company logo or other branding elements
Adjust the form layout to optimize user experience and encourage completion
Preview your form to ensure it aligns with your brand guidelines and functions as intended
By customizing your Web-to-Lead form's fields and design, you can create a seamless lead capture experience. You can also automate lead qualification to gather the information essential to your business.
Implementing Security Measures in Web-to-Lead Forms
When creating Web-to-Lead forms, it's crucial to implement security measures to prevent spam and protect the integrity of your lead data. Here's how you can secure your forms:
Enable reCAPTCHA in your Web-to-Lead form settings to prevent bot submissions and reduce spam. reCAPTCHA requires users to prove they are human by solving a challenge, such as identifying specific images or entering a displayed code.
Customize the reCAPTCHA settings to match your website's design and user experience preferences.
Ensure that the reCAPTCHA keys (site key and secret key) are correctly configured in your Salesforce settings and that the corresponding keys are used in your Web-to-Lead form code.
Enable reCAPTCHA in your Web-to-Lead form settings to prevent bot submissions and reduce spam
Salesforce also offers built-in security features to protect your lead data:
SSL/TLS encryption: Salesforce automatically encrypts all data transmitted between your website and Salesforce servers using secure SSL/TLS connections.
Field-level security: Control which users can access and modify specific fields in your lead records based on their user profiles and permission sets.
Validation rules: Create validation rules to ensure that lead data entered through Web-to-Lead forms meets specific criteria, such as format or value range, before being saved in Salesforce.
Learn more about securing data with web scraping techniques. By implementing reCAPTCHA and leveraging Salesforce's built-in security features, you can protect your Web-to-Lead forms from spam and maintain the integrity of your valuable lead data.
After creating your Web-to-Lead form in Salesforce, you need to integrate it into your website and test its functionality. Here's how:
Copy the generated HTML code for your Web-to-Lead form from Salesforce.
Paste the code into the HTML of the webpage where you want the form to appear. Make sure to place it within the <body> tags of your page.
Customize the form's styling using CSS to match your website's design and ensure a seamless user experience.
Test the form's functionality by filling out the fields and submitting the form. Verify that the lead data is captured correctly in Salesforce.
To test your Web-to-Lead form:
Fill out the form fields with sample data, including both valid and invalid inputs, to ensure proper validation and error handling.
Submit the form and check if the lead record is created in Salesforce with the correct information.
Test the form on different devices and browsers to ensure cross-platform compatibility and responsiveness.
Verify that any confirmation messages or thank-you pages are displayed correctly after form submission.
Check if any automated workflows or notifications triggered by new lead creation are working as intended.
By thoroughly testing your Web-to-Lead form, you can ensure a smooth lead capture process and maintain data integrity between your website and Salesforce. For more tips, see our guide on automate sales prospecting.
Optimizing and Managing Leads from Web-to-Lead Forms
Once leads start coming in through your Web-to-Lead forms, it's crucial to have a strategy in place for managing and nurturing them effectively. Here are some tips:
Set up lead assignment rules in Salesforce to automatically route new leads to the appropriate sales reps or teams based on criteria like location, industry, or company size.
Create lead scoring rules to prioritize leads based on their engagement level, demographic information, or other key factors. This helps sales teams focus on the most promising leads first.
Develop lead nurturing workflows using Salesforce's automation tools, such as email drip campaigns, to keep leads engaged and moving through the sales funnel.
Set up alerts and notifications for sales reps when new leads come in or when leads take specific actions, like opening an email or filling out a form.
Use Salesforce's reporting and analytics features to track lead source effectiveness, conversion rates, and other key metrics to optimize your lead generation efforts over time.
Automate your sales prospecting to save time and keep your leads organized. Try Bardeen and enhance your workflows with top sales prospecting tools today.
By implementing these strategies, you can ensure that your Web-to-Lead forms are not only capturing leads effectively but also setting your sales team up for success in converting those leads into customers.