Import Checkbox Values into HubSpot: A Step-by-Step Guide

LAST UPDATED
June 6, 2024
Jason Gong
apps
No items found.
TL;DR

Prepare your CSV, use HubSpot's import tool, and verify data.

By the way, we're Bardeen, we build a free AI Agent for doing repetitive tasks.

If you're importing data to HubSpot, check out Bardeen's automation tools. They help automate data imports, reducing manual work and errors.

Importing checkbox values into HubSpot is a crucial step in tracking customer interactions and preferences accurately. In this step-by-step guide, we'll walk you through the process of preparing your CSV file, using HubSpot's import tool, and verifying the imported data. By following these best practices, you can ensure that your checkbox data is properly formatted, imported, and managed within HubSpot, enabling you to enhance customer segmentation and personalization efforts.

Understanding Checkbox Properties in HubSpot

HubSpot offers two types of checkbox properties: single checkbox and multiple checkboxes. Single checkboxes store only two options (on or off), making them ideal for tracking boolean values such as true/false or yes/no. Multiple checkboxes, on the other hand, allow you to store several options, which is perfect for tracking customer preferences or interactions.

When preparing to import checkbox values into HubSpot, it's essential to understand the format requirements:

  • For multiple checkboxes, add a semicolon before the first value to append it to the existing property. To import multiple values, separate each value with a semicolon (e.g., ;value1;value2;value3).
  • For single checkboxes, set the value to "True" or "Yes" to display as checked, and "False" or "No" to display as unchecked.

By properly formatting your checkbox data, you can ensure a smooth import process and accurately capture customer information in HubSpot. For more on efficient data handling, check out data enrichment techniques.

Preparing Your CSV File for Import

To correctly format your CSV file for importing checkbox values into HubSpot, follow these steps:

  1. Ensure that each checkbox value is in its own column, with a clear header describing the checkbox.
  2. For multiple checkbox values, separate each value with a semicolon within the same cell (e.g., value1;value2;value3).
  3. For single checkbox values, use "True", "Yes", "False", or "No" to indicate the state of the checkbox.

Before importing, double-check your file for data integrity:

  • Confirm that boolean values are correctly formatted as "True"/"Yes" or "False"/"No".
  • Ensure that multiple checkbox values are properly separated with semicolons and do not contain any extra spaces.
  • Remove any blank rows or columns that might interfere with the import process.

By taking the time to properly format your CSV file and validate your data, you can build a robust prospect list and ensure that your checkbox values are accurately reflected in HubSpot.

Save time and effort by using Bardeen’s no-code tools to scrape data and prepare your CSV file quickly.

Using HubSpot's Import Tool

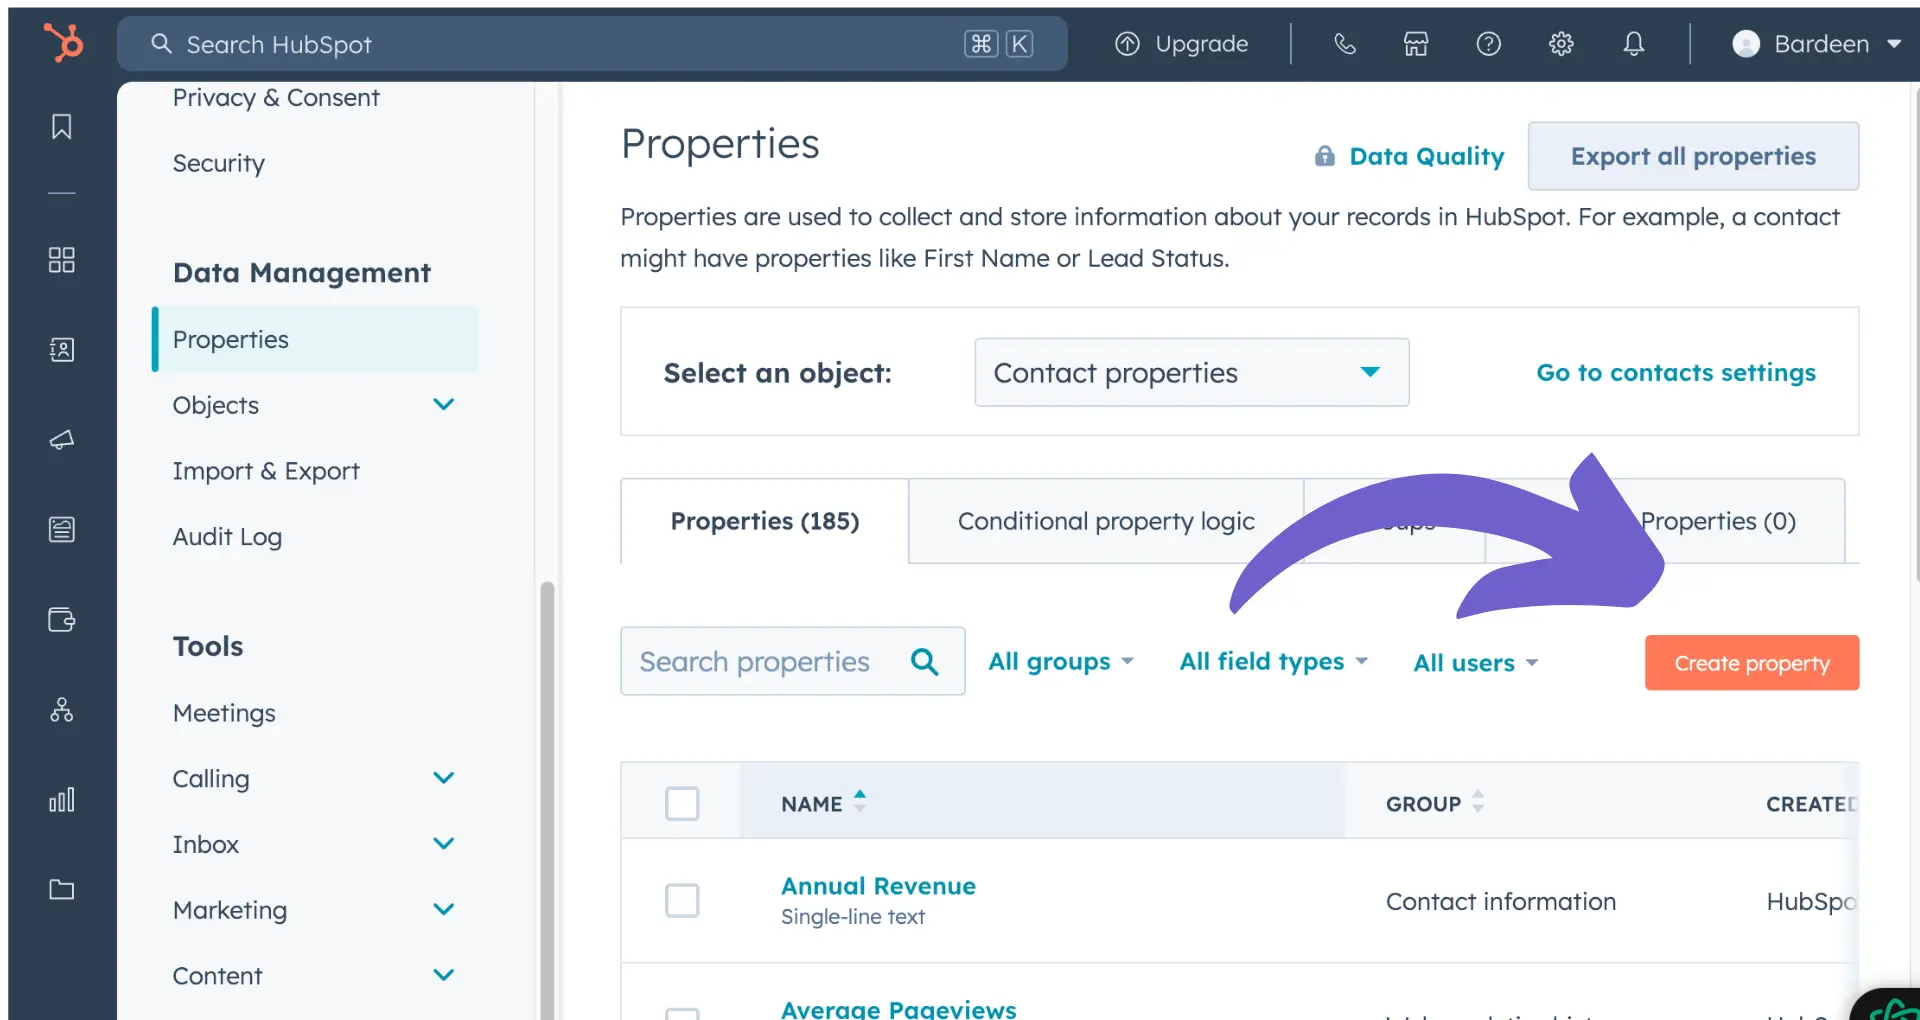
To access HubSpot's import tool, navigate to any object home page (e.g., contacts, companies, deals) and click the "Import" button in the top right corner. Alternatively, go to your account settings, select "Import & Export" from the left sidebar menu, and click "Go to import."

Follow these steps to upload your CSV file:

  1. On the Imports page, click "Start an import."
  2. Choose "File from computer," then click "Next."
  3. Select "One file" if you're importing a single object or "Multiple files with associations" if you're importing and associating multiple objects.
  4. Click "choose a file" and select your prepared CSV file.
  5. Choose how to import your data: create and update records, create new records only, or update existing records only.
  6. Click "Next" to proceed to the field mapping stage.

During the import process, HubSpot will attempt to automatically map the columns in your CSV file to the corresponding object properties. Review the mapping and make any necessary adjustments:

  • Ensure that all required properties are mapped correctly.
  • If a column doesn't map to an existing property, you can create a new custom property or choose not to import that column.
  • For updating existing records, map the unique identifier (e.g., email for contacts, company domain for companies) to avoid creating duplicates.

Once you've reviewed and confirmed the field mapping, click "Next" and enter a name for your import. If you're importing contacts, you can also choose to create a list of the imported contacts. Finally, click "Finish import" to complete the process. For more tips on tools to help with this, check out our sales prospecting tools.

Handling Common Import Issues

During the import process, you may encounter various issues that prevent data from being successfully added to HubSpot. Some common problems include:

  • Incorrect mapping of CSV columns to HubSpot properties
  • Data formatting errors, such as invalid email addresses or date formats
  • Duplicate records based on unique identifiers like email or company domain
  • Missing required property values
  • Exceeding import limits for certain object types

To troubleshoot these issues, follow these steps:

  1. Review the import summary for any error messages or warnings. HubSpot will provide details on the specific rows and columns affected by each error.
  2. Download the error file to see a detailed breakdown of the issues and the corresponding data.
  3. Make necessary corrections to your import file, such as fixing formatting issues, removing duplicates, or updating property mappings. Consider using web scraping tools to gather accurate data.
  4. If the errors persist, consider breaking your import file into smaller batches to isolate the problematic data.
  5. Reach out to HubSpot support or consult the community forums for further guidance on resolving complex import issues.

By proactively addressing these common import problems, you can enrich your data and maintain the integrity of your HubSpot database.

Use Bardeen's automation playbooks to streamline data import and reduce errors. Save time by automating repetitive tasks.

Verifying Imported Data in HubSpot

After importing your checkbox data into HubSpot, it's crucial to verify the accuracy and completeness of the transferred information. This step ensures that your marketing efforts are based on reliable data and helps you avoid potential issues down the line. Here's how to review and validate your imported checkbox values within HubSpot's interface:

  1. Navigate to the "Contacts" or "Companies" tab, depending on the object type associated with your imported checkbox properties.
  2. Use HubSpot's search and filtering options to find records containing the imported checkbox data.
  3. Click on individual records to open the contact or company details page and locate the checkbox properties.
  4. Verify that the checkbox values match your import file and that they are correctly associated with the appropriate records.
  5. If you notice any discrepancies or missing data, double-check your import file and consider re-importing the affected records.

Additionally, you can use HubSpot's built-in reporting tools to cross-reference your imported checkbox data with other properties and metrics. This can help you identify any inconsistencies or unexpected patterns that may indicate data quality issues.

By thoroughly verifying your imported checkbox data, you can confidently use this information to segment your audience, personalize your marketing messages, and analyze the effectiveness of your campaigns. For a more efficient process, consider using tools to automate sales prospecting and data management.

Best Practices for Managing Checkbox Data

To ensure your checkbox data remains accurate and actionable, it's essential to follow best practices for ongoing management within HubSpot. Here are some key strategies to keep in mind:

  1. Regularly review and update checkbox values to reflect changes in customer preferences, interests, or interactions. This helps maintain data integrity and relevance over time.
  2. Use HubSpot's bulk editing tools to efficiently update checkbox values for multiple records at once. This saves time and reduces the risk of manual errors when managing large datasets.
  3. Leverage checkbox data to create targeted lists and segments for your marketing campaigns. By grouping contacts or companies based on shared checkbox values, you can deliver more personalized and relevant content.
  4. Combine checkbox data with other HubSpot properties and analytics to gain deeper insights into your audience's behavior and preferences. This can inform your overall marketing strategy and help you make data-driven decisions.
Use Bardeen’s automation playbooks to save time and avoid manual errors. Let Bardeen handle repetitive tasks so you can focus on your strategy.

When checkbox data is properly managed and maintained, it becomes a powerful tool for enhancing customer segmentation and personalization efforts. By tailoring your marketing messages and offerings based on individual preferences and interests, you can improve engagement, conversion rates, and overall customer satisfaction.

Remember to regularly audit your checkbox data, remove outdated or irrelevant values, and ensure consistency across your HubSpot properties. By staying on top of your checkbox data management, you'll be well-equipped to maximize your marketing initiatives.

Supercharge Your HubSpot with Bardeen Automations

While importing checkbox values into HubSpot can streamline data management, automating this process with Bardeen can further enhance efficiency and accuracy. Automation ensures data integrity and reduces manual errors, making it invaluable for tasks like syncing data from various platforms into HubSpot. For those looking to maximize their CRM's potential, Bardeen offers a suite of playbooks perfect for enriching HubSpot data without manual input.

Explore these automation examples to enhance your HubSpot data management:

  1. Save Crunchbase company to HubSpot: Directly import company profiles from Crunchbase into HubSpot, ensuring your sales team always has the latest data at their fingertips.
  2. Copy all HubSpot products to Airtable: Seamlessly sync your HubSpot product catalog with Airtable, facilitating inventory management and sales planning.
  3. Copy all HubSpot contacts to Coda: Streamline client management by automatically transferring all your HubSpot contacts into a Coda table for enhanced data organization.

Embrace the power of automation with Bardeen to ensure your HubSpot CRM is always updated, allowing you to focus on strategic initiatives. Start today by downloading the Bardeen app.

Contents
Automate HubSpot Imports with Bardeen

Use Bardeen's AI Agent to streamline importing checkbox values into HubSpot, saving time and reducing errors.

Get Bardeen free

Related frequently asked questions

Personalize HubSpot Emails: A Step-by-Step Guide

Learn to personalize HubSpot emails using tokens, smart content, and templates for better engagement. Step-by-step guide included.

Read more
Import Opportunities into Salesforce: A Step-by-Step Guide

Learn how to import opportunities into Salesforce using the Data Import Wizard. Includes steps for importing opportunities with products for efficient sales management.

Read more
Embed Iframe in Notion: A Step-by-Step Guide

Learn how to embed an iframe into Notion with this step-by-step guide. Overcome common issues and discover alternatives for seamless integration.

Read more
How to Link Google Calendar to Notion: Step-by-Step Guide

Learn how to link Google Calendar to Notion effortlessly. Follow our step-by-step guide to manage your events and tasks from a single platform.

Read more
Explore SmartSuite: A Complete Work Management Solution

Discover how SmartSuite revolutionizes work management with robust project tracking, automation, and team collaboration features.

Read more
Decimal to Time Conversion in Google Sheets: Easy Steps

Learn how to convert decimal numbers to time in Google Sheets using simple formulas. Display hours, minutes, and seconds accurately in your spreadsheets.

Read more
how does bardeen work?

Your proactive teammate — doing the busywork to save you time

Integrate your apps and websites

Use data and events in one app to automate another. Bardeen supports an increasing library of powerful integrations.

Perform tasks & actions

Bardeen completes tasks in apps and websites you use for work, so you don't have to - filling forms, sending messages, or even crafting detailed reports.

Combine it all to create workflows

Workflows are a series of actions triggered by you or a change in a connected app. They automate repetitive tasks you normally perform manually - saving you time.

get bardeen

Don't just connect your apps, automate them.

200,000+ users and counting use Bardeen to eliminate repetitive tasks

Effortless setup
AI powered workflows
Free to use
Reading time
Thank you! Your submission has been received!
Oops! Something went wrong while submitting the form.
By clicking “Accept”, you agree to the storing of cookies. View our Privacy Policy for more information.