Print Labels from Google Sheets in 6 Steps

LAST UPDATED
June 6, 2024
Jason Gong
TL;DR

Print labels from Google Sheets using the Labelmaker add-on.

By the way, we're Bardeen, we build a free AI Agent for doing repetitive tasks.

If you're organizing data in spreadsheets, try our GPT in Spreadsheets. It automates formatting and data management, saving you time.

Printing mailing labels from Google Sheets is a convenient way to streamline your labeling process, saving time and effort. In this guide, we'll walk you through the steps to easily convert your Google Sheets data into printable labels using the Labelmaker add-on. We'll cover how to organize your data, install the add-on, design your labels, generate them in Google Docs, and print them correctly.

Setting Up Your Google Sheets for Label Printing

Before you can print labels from Google Sheets, it's essential to organize your data correctly. Start by ensuring that each column in your spreadsheet represents a specific data field, such as name, address, city, state, and ZIP code. Properly naming these columns will make it easier to connect Google Sheets to your label template later in the process.

When formatting your data, consider the following tips:

  • Use separate columns for each data field (e.g., "First Name," "Last Name," "Address," "City," "State," "ZIP")
  • Ensure that each row represents a single label or recipient
  • Remove any blank rows or columns
  • Verify that your data is free of typos, inconsistencies, or missing information

Correctly formatting your data is crucial because it directly impacts how your labels will appear when printed. Most label templates have specific requirements for data structure, so taking the time to organize your spreadsheet will save you from headaches later on. You can also bring AI into your spreadsheet to help with formatting and data management.

Choosing and Installing the Right Add-on for Label Creation

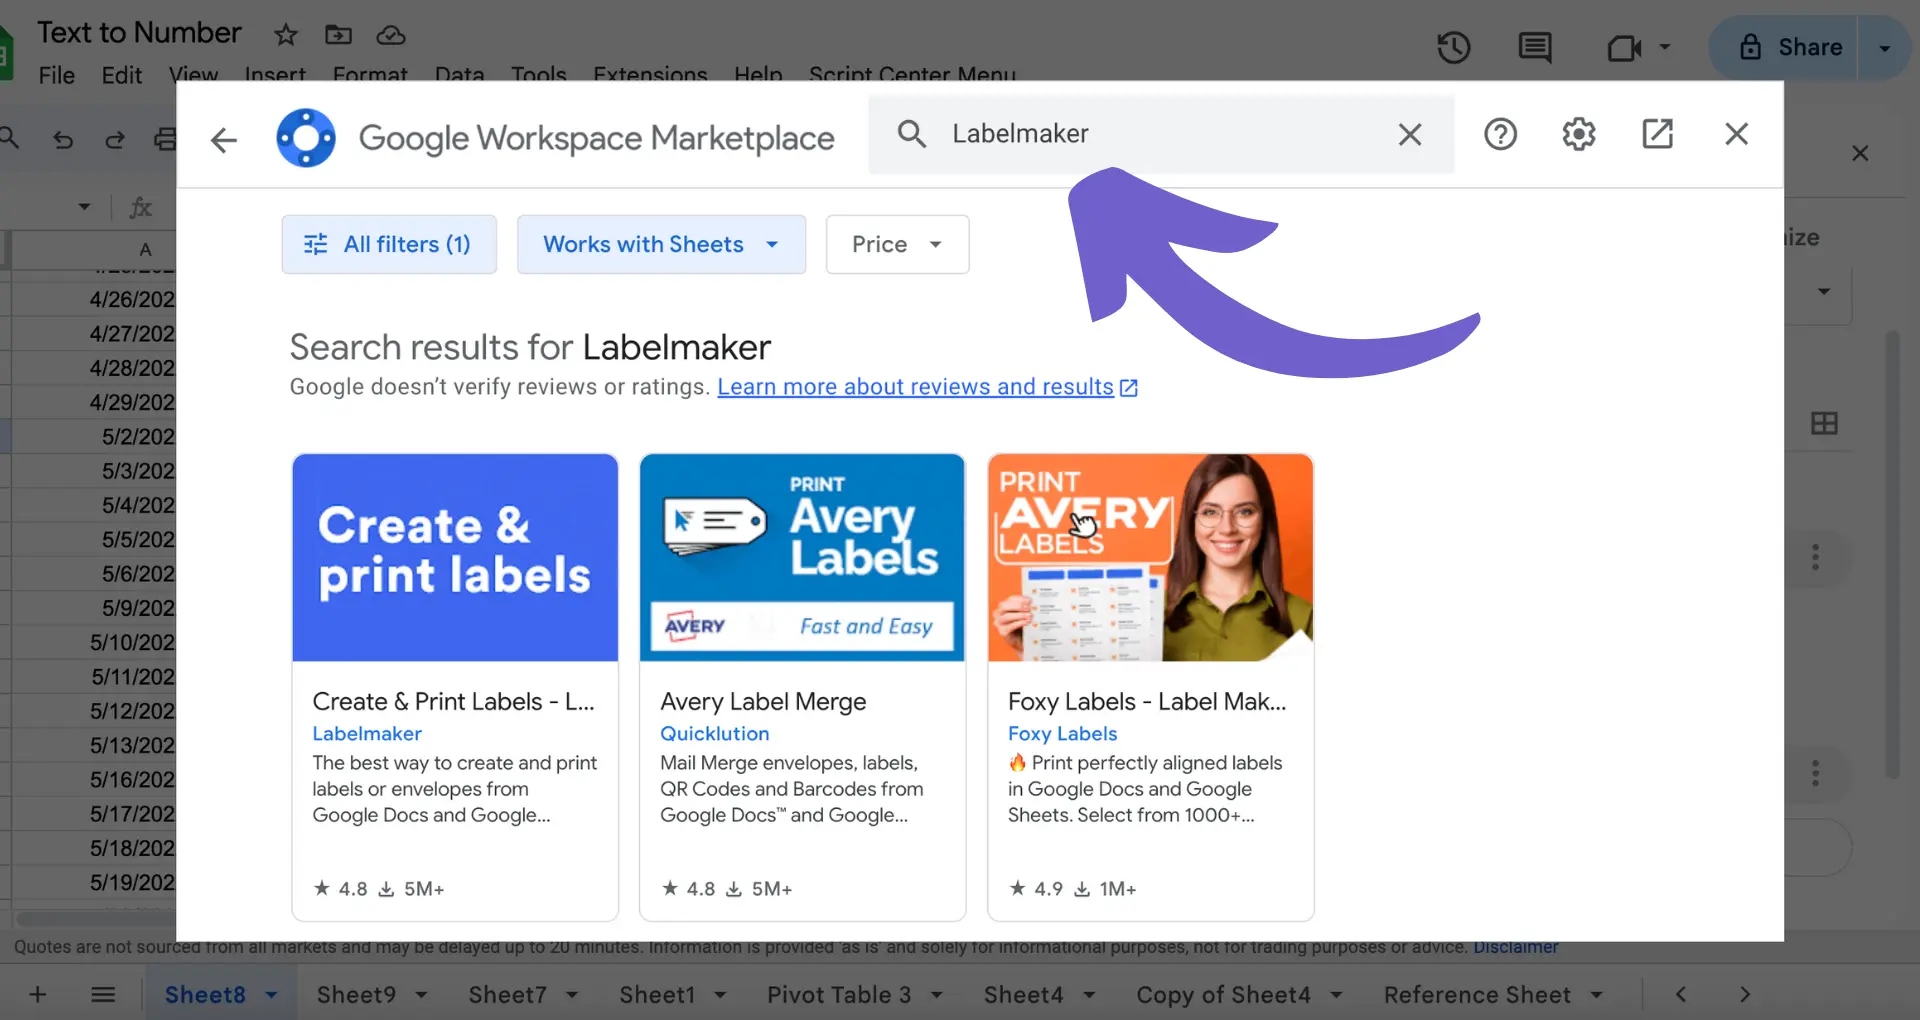
When it comes to selecting an add-on for creating labels in Google Sheets, Labelmaker is a popular choice available in the Google Workspace Marketplace. This add-on offers a wide range of templates and customization options, making it easy to create professional-looking labels directly from your Google Sheets data.

To install Labelmaker, follow these steps:

  1. Open Google Sheets and navigate to the spreadsheet you want to use for your labels.
  2. Click on "Add-ons" in the menu bar and select "Get add-ons."
  3. Search for "Labelmaker" in the Google Workspace Marketplace and click on the add-on.
  4. Click "Install" and grant the necessary permissions for Labelmaker to access your Google Sheets.
  5. Once installed, you can access Labelmaker from the "Add-ons" menu in Google Sheets.

With Labelmaker installed, you're ready to start creating labels using your Google Sheets data. The add-on seamlessly integrates with your spreadsheet, allowing you to map your data to the appropriate fields in the label template. For more advanced uses, you might want to integrate Google Drive with other apps.

Use Bardeen to integrate Google Drive with other apps, automating notifications and file management, saving you even more time.

Designing Labels Using Google Sheets Data

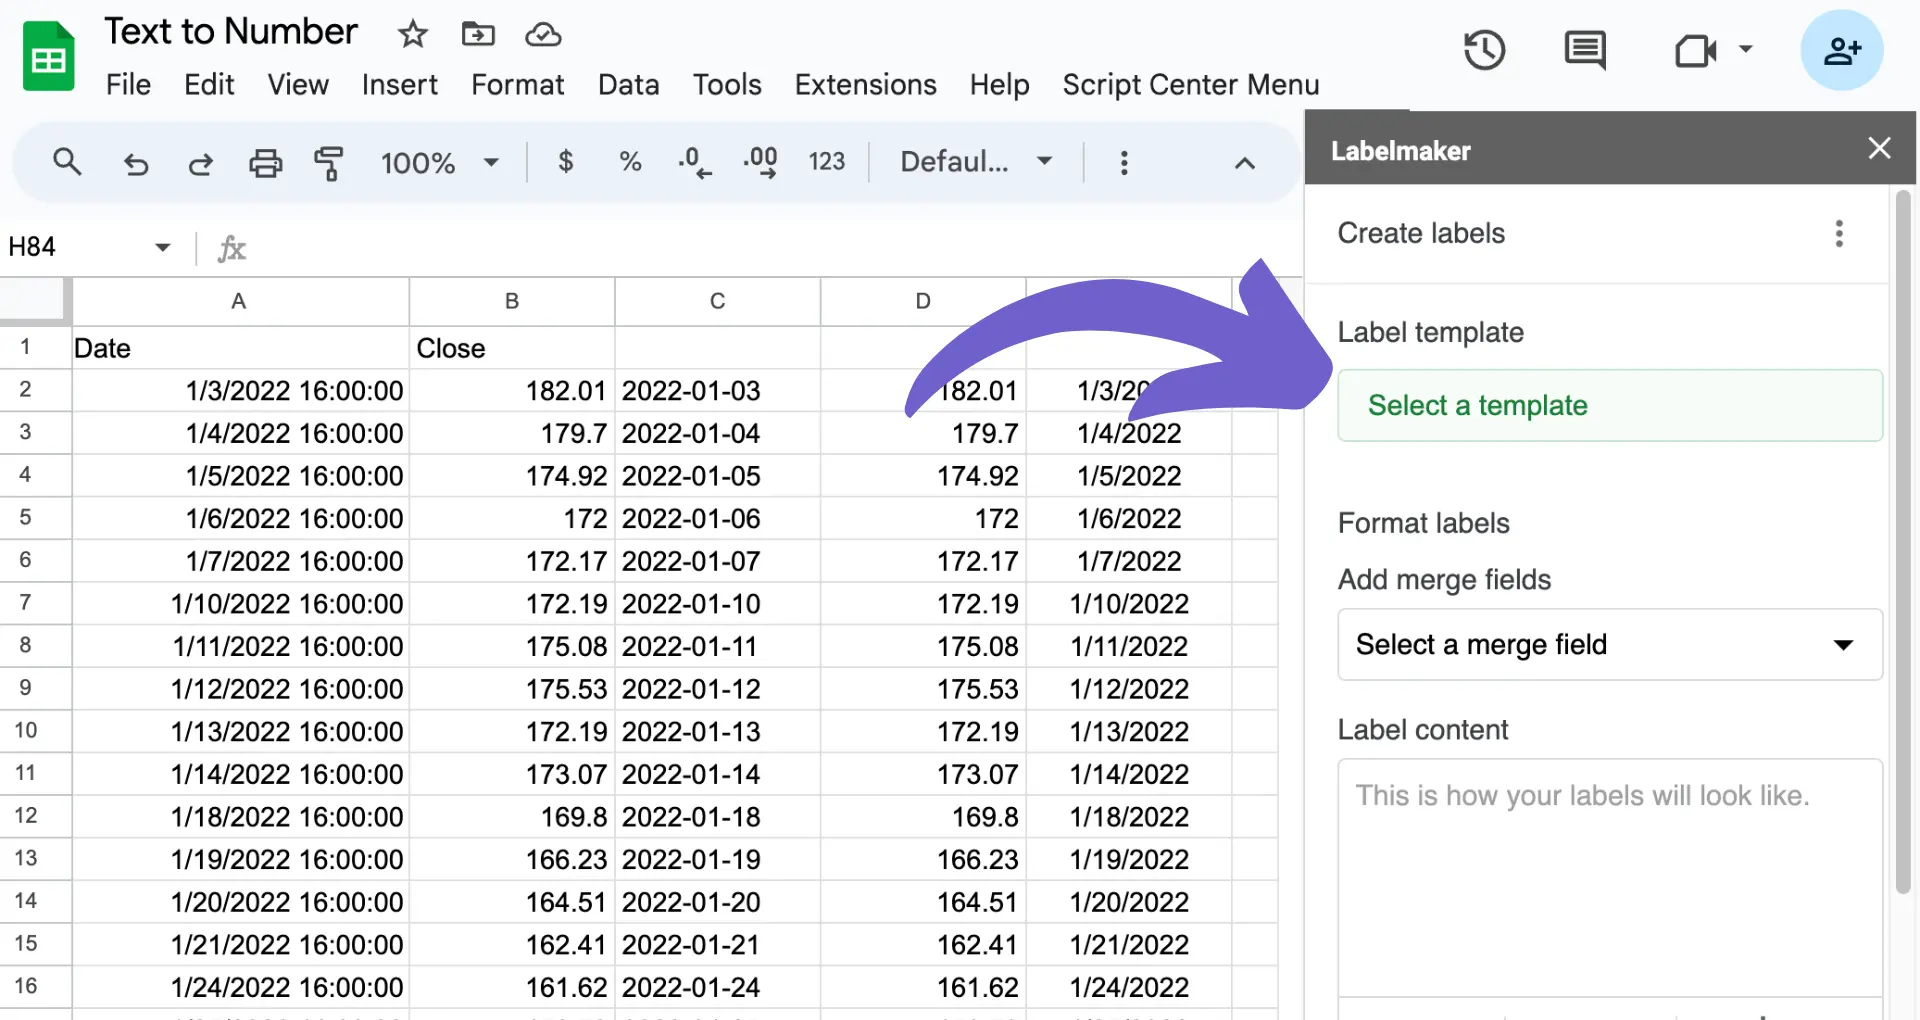
Once you have installed the Labelmaker add-on, you can start designing your labels using the data from your Google Sheets. To begin, open the Labelmaker sidebar by clicking on "Add-ons" in the menu bar and selecting "Labelmaker" from the list.

Follow these steps to design your labels:

  1. In the Labelmaker sidebar, click on "Select a template" and choose the appropriate label template from the list based on your label product (e.g., Avery US Letter 5160).
  2. In the content field, add merge fields that correspond to the column headers in your Google Sheets data. Use double arrows to enclose the merge fields, such as <<address>> for the address column and <<city>> for the city column.
  3. Customize your label design by applying formatting options like bold, italic, or text alignment. Labelmaker offers a range of formatting tools to help you create professional-looking labels.

Here are some tips for customizing your label design:

  • Use bold formatting to emphasize important information, such as names or company names.
  • Apply italic formatting to add visual interest or differentiate certain elements, like job titles or product descriptions.
  • Align text to the left, center, or right to create a balanced and visually appealing layout.
  • Adjust font sizes to ensure that all the necessary information fits within the label template and remains legible.

By using merge fields and formatting options, you can create custom labels that automatically populate with your Google Sheets data, saving time and ensuring consistency across your labels. For more advanced integration, you can connect Google Docs with your Google Sheets to streamline your workflow.

Creating and Reviewing Labels Before Printing

After designing your labels using the Labelmaker add-on, you can generate the labels in a new Google Docs document. To do this, simply click the "Create labels" button in the Labelmaker sidebar. The add-on will automatically populate the labels with the data from your Google Sheets, creating a new label for each row of data.

Once the labels are generated in the new Google Docs document, it's essential to review them carefully before printing. This step ensures that all the information is accurate and the labels are formatted correctly. Here are some tips for reviewing your labels:

  • Check that the data from your Google Sheets has been correctly merged into the appropriate fields on the labels.
  • Verify that the formatting, such as bold, italic, and text alignment, is consistent and visually appealing.
  • Look for any truncated or overlapping text, which may indicate that the label template needs adjusting or the font size needs to be reduced.
  • Confirm that the correct label template has been used and matches your label product.

If you notice any errors or inconsistencies during the review process, return to your Google Sheets and make the necessary changes. Then, regenerate the labels in Google Docs by clicking the "Create labels" button again in the Labelmaker sidebar. This will create a new document with the updated labels, ensuring that your changes are reflected.

By thoroughly reviewing your labels before printing, you can avoid wasting time and resources on misprinted labels and ensure that your mailing list is professional and error-free. For more advanced data handling in spreadsheets, consider using GPT in Spreadsheets.

Save time managing your spreadsheet data by using AI-powered integrations with Excel to automate repetitive tasks.

Printing Your Labels Correctly

Once you have reviewed and finalized your labels in the Google Docs document, it's time to print them. To ensure your labels print correctly, you'll need to adjust your print settings. Here's how:

  1. In the Google Docs document containing your labels, click on "File" and then "Print".
  2. In the print dialog box, set the margin to "None" to ensure the labels are printed edge-to-edge.
  3. Adjust the scale to 100% to maintain the proper sizing of your labels.
  4. Choose the correct paper size based on your label product. For example, if you're using Avery US Letter 5160 labels, select "Letter" as the paper size.

If you encounter any issues with misaligned labels, try the following troubleshooting tips:

  • Double-check that you've selected the correct label template in the Labelmaker add-on.
  • Ensure your printer is set to print at 100% scale and that no scaling options are enabled.
  • Verify that the paper size in your print settings matches the label product you're using.
  • If the issue persists, try adjusting the margins slightly in the Google Docs document to compensate for any printer irregularities.

By following these steps and making the necessary adjustments, you can ensure that your labels print correctly and align perfectly with your label sheets. With your labels printed, you're now ready to apply them to your envelopes or packages and send out your mail with ease.

Automate Your Google Sheets Workflows with Bardeen

While converting Google Sheets into labels can be a manual process involving add-ons, automating tasks related to Google Sheets can significantly enhance productivity and efficiency. Automation through Bardeen can streamline various processes, such as organizing email information or managing project tasks directly from Google Sheets. Here are a few examples of how Bardeen can automate tasks related to Google Sheets:

  1. Save labeled emails to Google Sheets, including attachments stored on Google Drive: Automate the process of saving specific labeled emails to Google Sheets, including uploading any attachments to Google Drive. This is ideal for managing email correspondence and attachments systematically.
  2. Save links from labeled emails to Google Sheets: This playbook automates the task of extracting links from emails and saving them directly to Google Sheets, perfect for organizing important links from email communications.
  3. Copy all Github issues to Google Sheets: For development teams, this automation streamlines the process of copying GitHub issues into a Google Sheets spreadsheet for better issue tracking and management.

Automating these tasks not only saves time but also ensures accuracy and efficiency in managing data between emails, project management tools, and Google Sheets. Explore these playbooks to enhance your workflow automation.

Contents
Automate repetitive tasks with Bardeen

Bardeen's AI Agent makes managing data and automation in Google Sheets effortless.

Get Bardeen free

Related frequently asked questions

Adding Fonts to HubSpot: A Step-by-Step Guide

Learn how to add fonts to HubSpot, including default, Google, and custom fonts, to enhance your content and maintain brand consistency.

Read more
Change HubSpot Contact Status in 5 Steps

Learn how to change a contact's marketing status in HubSpot, including setting as marketing or non-marketing, manually or through automation.

Read more
How to Add Images to Google Sheets: A Step-by-Step Guide

Learn how to add images to Google Sheets, including inserting into cells, creating clickable images, and simulating backgrounds. Step-by-step guide included.

Read more
Convert Radians to Degrees in Google Sheets: Easy Steps

Learn to convert radians to degrees in Google Sheets using the DEGREES function or a simple formula for efficient data analysis.

Read more
Add HubSpot Certification to LinkedIn: A Step-by-Step Guide

Learn how to manually add your HubSpot certification to LinkedIn by updating the Licenses & Certifications section, showcasing your achievements.

Read more
Guide to Web Scraping Password-Protected Sites in 5 Steps

Learn how to scrape password-protected sites using Python, Selenium, and no-code platforms while ensuring compliance with legal standards.

Read more
how does bardeen work?

Your proactive teammate — doing the busywork to save you time

Integrate your apps and websites

Use data and events in one app to automate another. Bardeen supports an increasing library of powerful integrations.

Perform tasks & actions

Bardeen completes tasks in apps and websites you use for work, so you don't have to - filling forms, sending messages, or even crafting detailed reports.

Combine it all to create workflows

Workflows are a series of actions triggered by you or a change in a connected app. They automate repetitive tasks you normally perform manually - saving you time.

get bardeen

Don't just connect your apps, automate them.

200,000+ users and counting use Bardeen to eliminate repetitive tasks

Effortless setup
AI powered workflows
Free to use
Reading time
Thank you! Your submission has been received!
Oops! Something went wrong while submitting the form.
By clicking “Accept”, you agree to the storing of cookies. View our Privacy Policy for more information.