Adding a professional email signature in Salesforce can elevate your business communications and reinforce your brand identity. In this step-by-step guide, we'll walk you through the process of setting up and customizing your email signature in Salesforce. Whether you're new to Salesforce or looking to optimize your email settings, this guide will provide you with the knowledge and tools to create an impactful email signature.
Introduction to Email Signatures in Salesforce
Email signatures in Salesforce play a vital role in enhancing your professional communication and reinforcing your brand identity. By incorporating a well-crafted email signature, you can:
Provide essential contact information, making it easy for recipients to reach out to you
Maintain a consistent brand image across all email communications sent from Salesforce
Convey professionalism and attention to detail in your interactions with clients, partners, and colleagues
Moreover, Salesforce offers flexibility in creating and managing email signatures, allowing you to personalize your signature while adhering to your organization's branding guidelines. Whether you prefer a simple text-based signature or a more visually appealing design using HTML, Salesforce accommodates your needs. For more tips on effective email management, consider using AI to generate personalized emails.
Setting Up Your Email Signature in Salesforce
To set up your email signature in Salesforce, follow these steps:
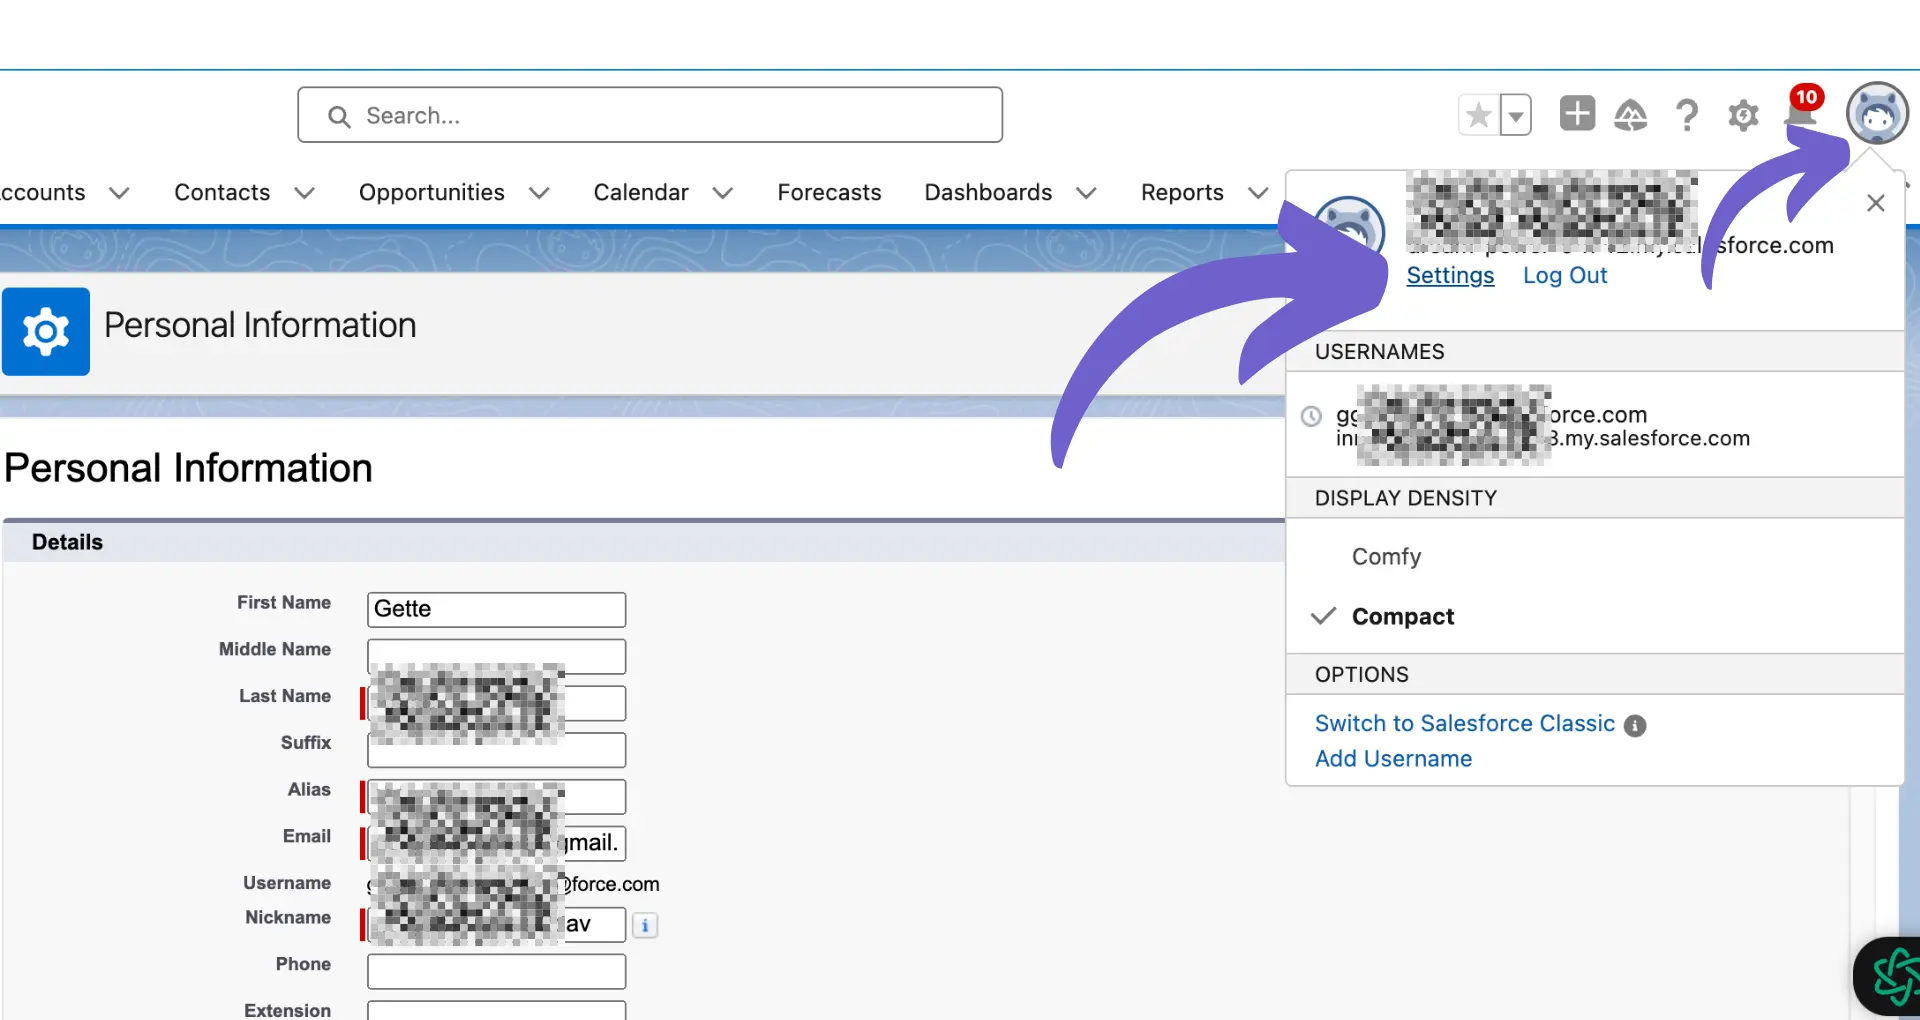
Log in to your Salesforce account and navigate to your user profile by clicking on your name in the top right corner.
From the dropdown menu, select "Settings" to access your personal settings.
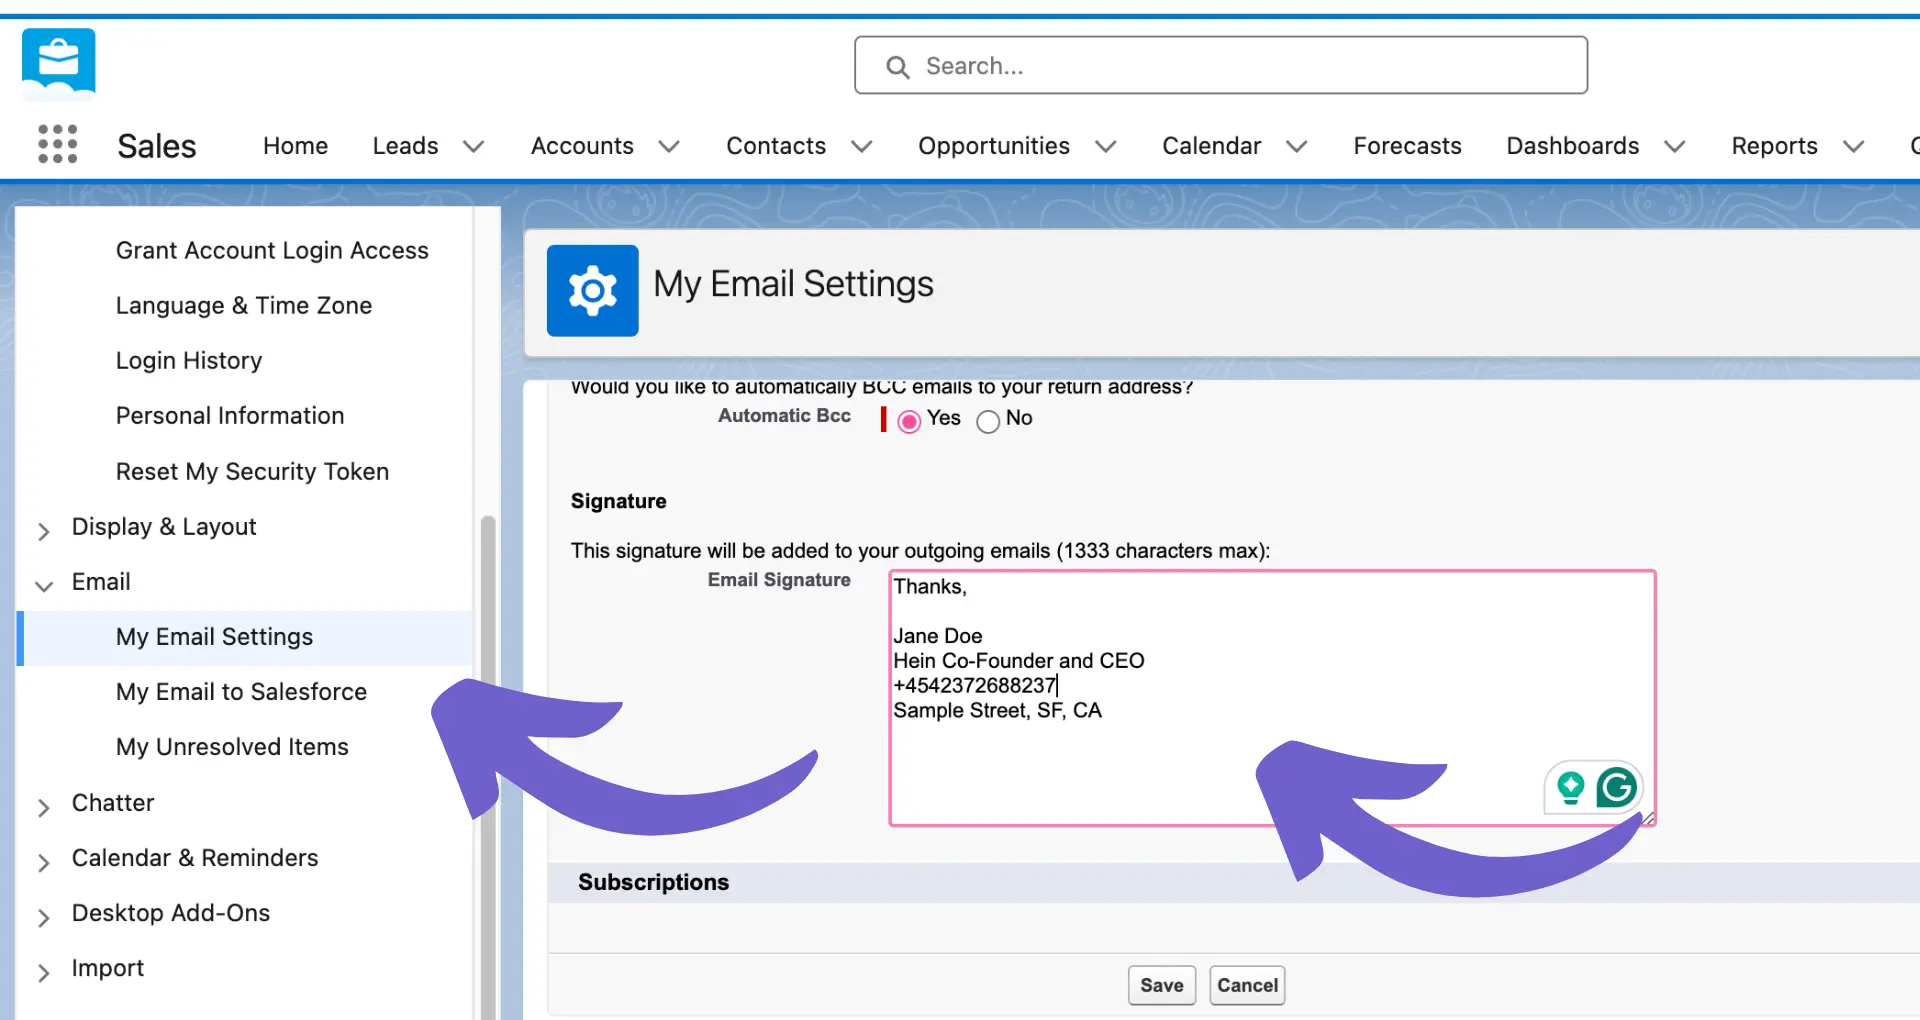
In the left sidebar, locate and click on "Email" to expand the email-related options.
Click on "My Email Settings" to access the email configuration page.
Scroll down to the "Email Signature" section and click on the "Edit" button to create or modify your signature.
In the text editor, enter your desired email signature content, including your name, title, company, contact information, and any relevant links or disclaimers.
Use the formatting tools provided in the editor to customize the appearance of your signature, such as font style, size, color, and alignment.
Consider adding a logo or social media icons to enhance the visual appeal of your signature. You can upload images by clicking on the "Insert Image" button in the editor.
Once you are satisfied with your email signature, click on the "Save" button to apply the changes.
From the dropdown menu, select "Settings" to access your personal settings
Your new email signature will now be automatically included in all outgoing emails sent from Salesforce. If you need to update your signature in the future, simply follow the same steps to access the email signature editor and make the necessary modifications.
If you found this guide helpful, you might also want to prepare for a sales call using similar steps.
Automate tasks like building a prospect list to focus on more important work. Let Bardeen handle repetitive tasks for you.
Customizing Email Signatures with HTML
To create more dynamic and visually appealing email signatures in Salesforce, you can use HTML code. Here's how:
Navigate to your email signature settings in Salesforce, as described in the previous section.
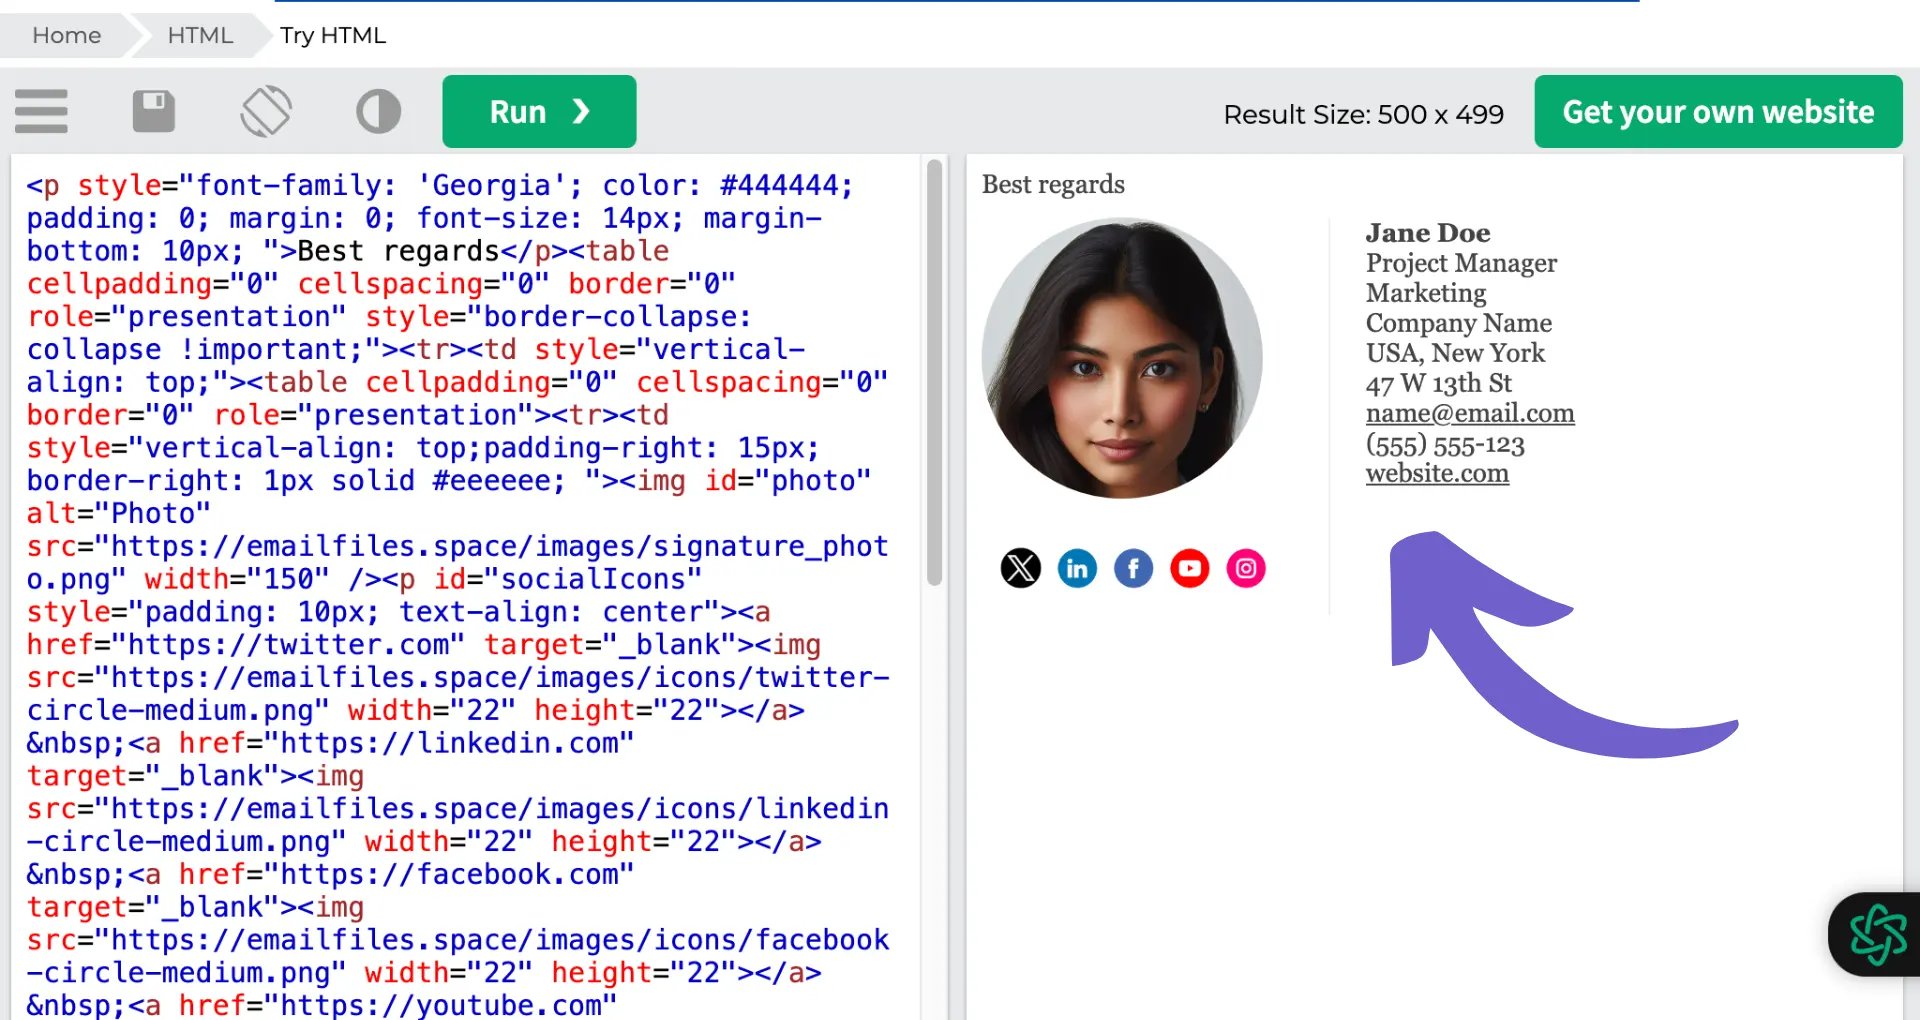
In the email signature editor, switch from the "Rich Text" view to the "HTML" view by clicking on the corresponding tab.
If you have existing content in your signature, it will be automatically converted to HTML code.
To incorporate logos or images, use the <img> tag and provide the URL of the image file. For example: <img src="https://example.com/logo.png" alt="Company Logo">
To add links to your website or social media profiles, use the <a> tag with the href attribute. For example: <a href="https://example.com">Visit our website</a>. You can also manage your email with AI tools to keep your email signature up to date.
For social media icons, you can either use image files or icon fonts. To use image files, follow the same process as adding a logo. To use icon fonts, such as Font Awesome, include the necessary CSS stylesheet in your HTML code and use the appropriate classes for each icon.
Customize the appearance of your signature by using inline CSS styles. For example, to change the font color, use the style attribute: <p style="color: #ff0000;">Your Name</p>
Once you have finished editing your HTML signature, click the "Save" button to apply the changes.
Remember to test your email signature by sending a test email to yourself or a colleague to ensure that it appears as intended across different email clients and devices.
Integrating Email Signatures into Salesforce Email Templates
To ensure consistent branding and save time, you can integrate your email signatures into Salesforce email templates. Follow these steps:
Create your email signature using the methods described in the previous sections.
Navigate to the "Email Templates" section in Salesforce Setup.
Create a new email template or edit an existing one.
In the email template editor, place your cursor where you want to insert the signature.
Click the "Insert" dropdown menu and select "Signature."
Choose the appropriate signature from the list of available signatures.
Save your changes to the email template.
By integrating your email signature into Salesforce email templates, you can ensure that all outgoing emails from your organization have a consistent and professional appearance. This also saves time, as users won't need to manually add their signatures to each email they send.
To manage and update email signatures across various templates, use Salesforce's template editor. When you make changes to a signature that is used in multiple templates, the updates will automatically be applied to all the associated templates. This centralized management of email signatures and templates helps maintain consistency and makes it easy to implement changes across your organization.
Best Practices and Common Pitfalls
When creating email signatures in Salesforce, follow these best practices to ensure effectiveness and professionalism:
Keep your signature concise and easy to read, including only essential information such as your name, title, company, and contact details.
Use a clean, simple design that aligns with your brand's visual identity.
Ensure your signature looks good on both desktop and mobile devices by testing it across different email clients and screen sizes.
Regularly update your signature to reflect any changes in your contact information or company branding.
To avoid common pitfalls, keep these tips in mind:
Avoid using too many colors, fonts, or images that can make your signature look cluttered and unprofessional.
Don't include large file attachments or images, as they can trigger spam filters and slow down email loading times.
Refrain from adding lengthy disclaimers or legal statements that can distract from your main message.
Be cautious when using social media icons or links, ensuring they lead to professional profiles that align with your brand's image.
By following these best practices and avoiding common mistakes, you can create effective and professional email signatures that enhance your communication and reinforce your brand identity in Salesforce.